There is nothing quite as frustrating as arriving home, pressing your button, and getting zero response from your gate.
You are stuck in the driveway, and usually, it happens when it is raining or late at night.
Before you panic or call for a technician, we recommend running through a few specific checks.
Our team finds that nearly half of the “broken” gate systems we assess can be fixed by the homeowner in under ten minutes.
This guide walks you through the troubleshooting steps we use daily for our gate and garage remote service covering common South African brands like Centurion, Gemini, ET Systems, and CAME.
Step 1: Check the Battery (Voltage Matters)
The single most common cause of a non-working gate remote is a dead or weak battery.
We see this issue responsible for the vast majority of our callouts.
A battery might have enough power to light the LED but not enough voltage to transmit a strong signal to the receiver.
How to Diagnose
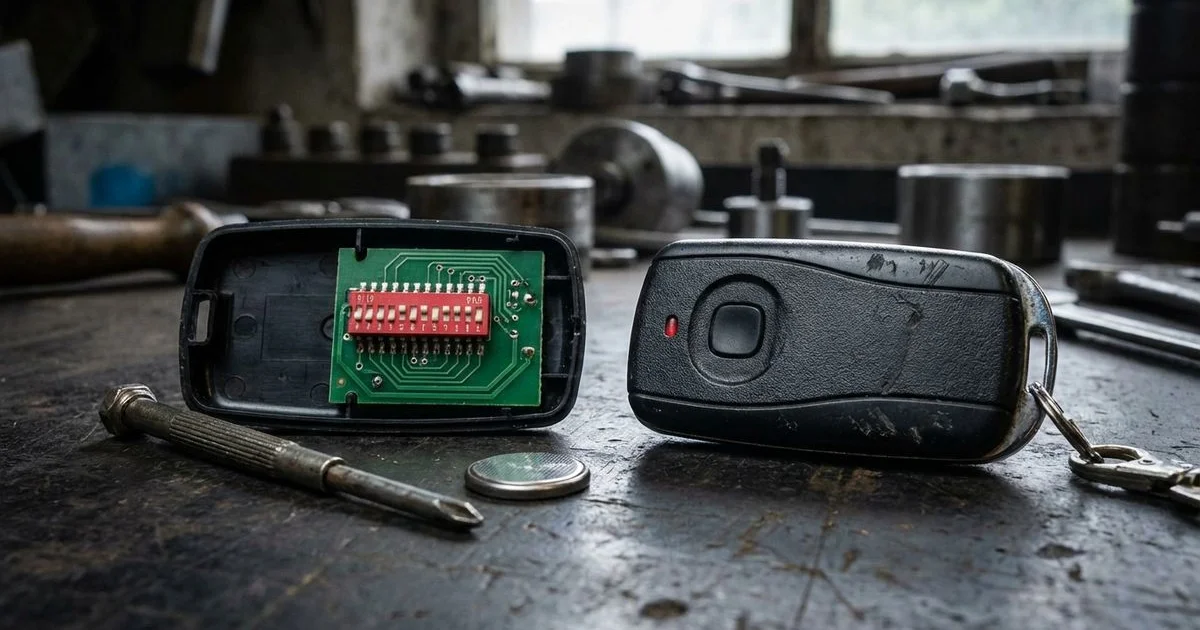
- Open the remote’s battery compartment (this usually requires a small Phillips screwdriver or a coin).
- Remove the battery and inspect the contact points.
- Look for white or green corrosion residue, which blocks the flow of electricity.
- If the contacts are clean, test the battery with a multimeter if you have one.
Battery Specifications by Brand
Finding the right replacement is critical, as using the wrong voltage can damage the circuit board.
| Brand | Common Models | Battery Type | Voltage |
|---|---|---|---|
| Centurion | Nova, Smart, Centsys | GP23A or CR2032 | 12V or 3V |
| Gemini | Code-Hopping, 3-Button | 23A (Alkaline) | 12V |
| ET Systems | ET-Blu Mix, 4-Button | GP23A or CR2032 | 12V or 3V |
| CAME | TOP, Twin, Atomo | CR2016 (x2) or CR2032 | 3V or 6V |
We advise replacing gate remote batteries proactively every 12 months. A battery reading under 11 volts (for a 12V unit) often causes intermittent signal drops that are frustratingly hard to diagnose.
Step 2: Check the Remote’s LED Status
Most gate remotes feature a small LED indicator that provides immediate diagnostic feedback.
This light tells us if the remote is physically trying to send a signal.
- LED lights up brightly: The remote is transmitting. The issue is likely at the gate motor or receiver end.
- LED does not light up: The remote has a power failure. This indicates a dead battery, a broken battery contact, or a damaged circuit board.
- LED is dim or flickers: The battery is weak. Replace it immediately.
- LED stays solid without pressing: A button is stuck. We see this happen when dirt or sticky residue gets under the rubber casing.
Step 3: Check for Range and Interference
If your remote works when you are standing right next to the motor but fails from the street, you are dealing with a range or interference issue.
We frequently trace this problem back to environmental factors rather than hardware failure.
Common Signal Blockers
- RF Interference: Wireless doorbells, baby monitors, and improperly shielded electric fences often jam the 433MHz frequency used by most remotes.
- Antenna Positioning: The small wire antenna on the motor receiver might be broken or tucked inside the housing.
- Physical Obstacles: Dense vegetation or new metal cladding on a gate can absorb the signal.
- Atmospheric Conditions: High humidity across the Dolphin Coast or heavy thunderstorms can temporarily shorten transmission distance.
Practical Solutions to Try
- Replace the battery with a fresh, high-quality brand (cheap batteries often have lower peak voltage).
- Straighten the receiver antenna wire so it stands vertically.
- Identify any new wireless devices installed in your home recently and switch them off to test.
- Check if the “Signal Jamming” alarm is active on your keypad (common on Centurion D5 models).
Step 4: Inspect the Gate Motor and Backup Battery
If your remote’s LED is firing but the gate remains stationary, the problem is likely at the motor itself.
Our technicians start by checking the power source, especially given the frequency of load shedding cycles.
The Load Shedding Factor
South African gate motors rely heavily on 12V backup batteries.
Constant power cuts damage lead-acid batteries over time, reducing their ability to hold a charge.
- The 10.5V Threshold: If your backup battery drops below 10.5V, the motor’s electronics may wake up, but the heavy lifting motor will not engage.
- Audible Warnings: Many Centurion motors will beep (usually 3 short beeps) to indicate low battery voltage.
- Mains Power: Ensure the isolator switch is “ON” and the circuit breaker in your distribution board hasn’t tripped.
Understanding LED Diagnostic Codes
Modern motors use light sequences to tell you exactly what is wrong.
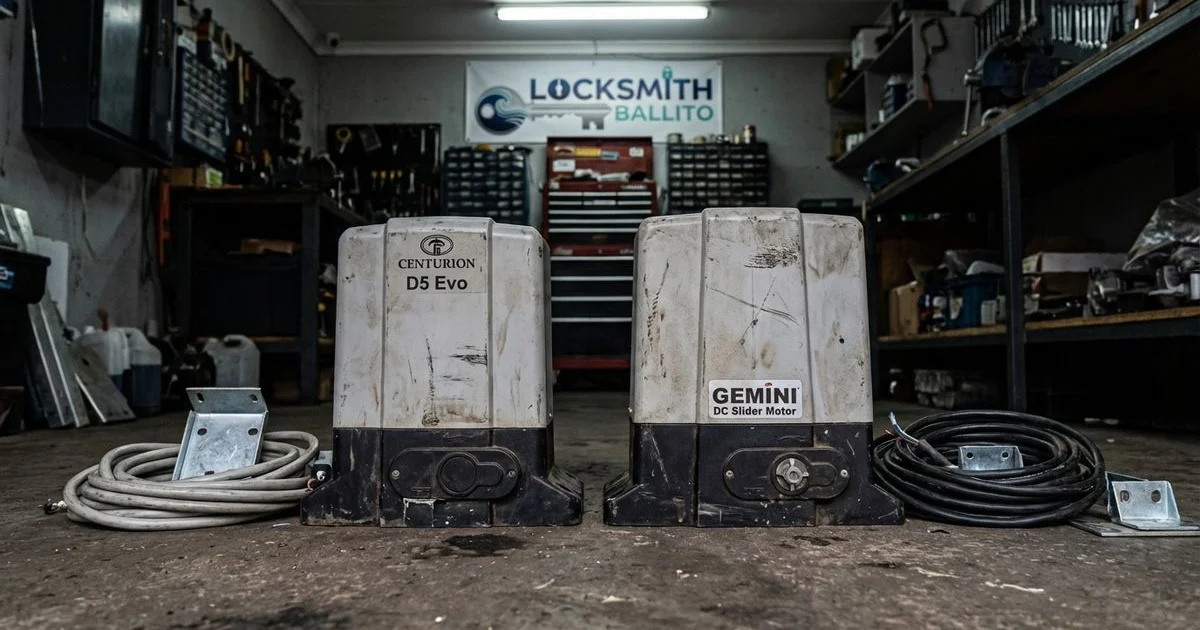
Centurion D5 Evo / D5 Smart:
- Steady Green: Mains power is on, and the system is healthy.
- Flashing Red: Use the number of flashes to identify the error (e.g., 3 flashes often means battery low/mains fail).
- Solid Red: A hardware fault or serious obstruction.
Gemini DC Slider:
- Continuous Slow Flash: Mains failure (running on battery).
- Rapid Flash: Battery is critically low.
- Solid LED: Obstruction detected.
ET Drive:
- Seven Segment Display: Look at the screen on the control board; it will display a code (e.g., “Bt” for Battery Low).
Do not touch the main circuit board if the mains power is active. 220V electricity is dangerous. If you see charred components or smell burning plastic, isolate the power and call a professional immediately.
Step 5: Re-learn the Remote
Sometimes the remote and the receiver simply stop “talking” to each other.
We find this often happens after a lightning storm, a long power outage, or if the receiver memory has been accidentally wiped.
The “Rolling Code” Desync
Modern remotes use rolling code technology (like Keeloq) for security.
If you press your remote button too many times while out of range of the gate, the remote’s code sequence may drift too far ahead of the receiver’s expectation.
How to Re-sync Your Remote
The exact steps depend on your specific receiver, but the general logic remains consistent.
- Locate the Receiver: This is usually a small rectangular board inside the motor housing.
- Find the Learn Button: Look for a button marked “Learn,” “Prog,” or a jumper pin.
- Activate Learning Mode: Press the button on the receiver once. An LED usually turns on or flashes.
- Transmit the Signal: Press and hold the button on your remote for 1-2 seconds.
- Confirm Success: The receiver LED should flash rapidly or turn off to confirm it has stored the code.
Refer to your specific motor manual for the exact sequence.
Step 6: Check for Physical Obstructions and Pests
If the motor clicks or hums but the gate does not move, the path is likely blocked.
We frequently discover that the issue is mechanical rather than electrical.
What to Look For
- Debris on the Track: Stones, mud, or compacted leaves can stop the wheels from turning.
- The “Ants” Issue: In South Africa, ants love the warmth of gate motor housings. They often build nests behind the PC board, causing short circuits or blocking the safety beams.
- Manual Override: Ensure the manual release lever is fully locked back into the “Gear” or “Drive” position.
- Safety Beams: Wipe the photocell lenses with a damp cloth. Spiders often spin webs inside the beam covers, breaking the connection and preventing the gate from closing.
When to Call a Professional
Some issues require specialized tools and parts to resolve safely.
You should contact a certified technician if you encounter the following scenarios:
- The motor makes a grinding or high-pitched whining noise.
- You smell burning electronics or see smoke.
- Replacing the battery and re-learning the remote has no effect.
- The gate has physically derailed or the rack (the teeth on the gate) is stripped.
- There is visible lightning damage to the board.
- The backup battery is swollen or leaking acid.
Prevention Tips for Longevity
- Keep it clean: Sweep the track weekly to prevent stone buildup.
- Pest control: Place mothballs or an ant trap inside the motor housing (away from the electronics) to deter nesting.
- Lubrication: Do not grease the rack or pinion. Grease collects dust and turns into a grinding paste.
- Regular service: We suggest a professional service every 12 to 18 months to check the tension and alignment.
A reliable gate motor is your first line of defense for homeowners in Ballito and the surrounding areas.
Taking ten minutes to check these basics can save you the cost of a callout fee and get your security back up and running quickly.